Zelda Ocarina Of Time Master Quest on N64 - Forest Temple

save

Before actually entering the temple, go to the far right of the small garden patch and climb the ivy behind the tree. Shift to the right and release the ivy to find yourself at the top of the trunk. Use your hookshot to shoot the big skulltula opposite you. You will have to jump to the other tree; the jump is not easy. Step on the switch to make a chest appear and cross back over. Take the small key from the chest and go back down to enter the temple.


You arrive in a corridor. The hookshot will be helpful again as it allows you to defeat the 3 large skulltulas in succession without moving. There is also a gold skulltula in this corridor. You reach the main room of the Temple from the south. Moving a bit towards the center of the room, you will see 4 ghosts appear at the level of the 4 torches and an elevator descend in its center. Each will head to one of the 4 corners. You will have to kill them all to be able to use the elevator. Easier said than done as this palace might be the longest in Master Quest. Even though the ghosts took the 4 corners, we will start by going straight through the door at the top of the stairs. This is the North door; I will use cardinal points for this room from now on even if you don't have the compass yet. Since we arrive from the South in the temple, it's quite simple. In the corridor, you will have to play the Song of Time in front of the block to make it disappear. Take the door, kill the 2 wolves, and collect the small key from the chest. Return to the central room and go through the West door.


A Stalfos awaits you in the corridor; kill it to open the gate and open the door. The next room can be a bit tedious if you don't have a good sense of direction. At the entrance, there is a gold skulltula. First climb the first 2 ladders then go through the door on the left. On the small diagram I made, you arrive at "0". Take the corridor on the left to pull the block (1) as far as possible. Then take the corridor and climb the ladder (2). Advance a bit and take the first corridor on the right. At the end, pull the block (3) enough so that it no longer blocks a perpendicular corridor that cannot be seen. Turn around and go back down the ladder (4). Take the corridor on the left then immediately right and right again. Push the block all the way (5). The block will fall into a small recess. Climb on it then climb to the right. Follow the corridor and push the block again all the way (7). It will also land in a small recess. Climb on it once more (8). Hit the switch to raise a hookshot block. Then follow the right corridor, climb the ladder, and go open the door at the end of the large room.


Cross the corridor. In the following room, jump down and open the yellow and blue chest to obtain the boss key.


Jump into the hole and fight the hand (and the 3 small hands that follow) to open the door you must take. Walk along the balcony and take the second passage on the right (just before the back door). Defeat the Redead to obtain a small key and exit the room. Take the door directly to the right.


You arrive right in front of a switch; hit it to "twist" the corridor you used recently. Go down and use the hookshot towards the target. From there, turn around to jump on the translucent blocks. From the second one, you should be able to reach a new target. Take the straight corridor to take the ladder just on the right. Take the door again to find yourself in the corridor you twisted and thus find yourself in the boss key room which has rotated 90°. Jump onto the middle platform then to the right and open the locked door.
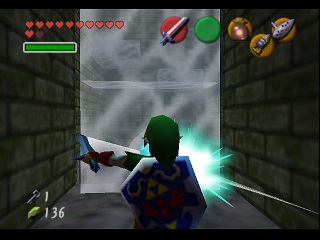


Then go down the stairs and take the door. A Stalfos attacks you; be careful not to fall into the middle of the room so you don't have to go around again. Once eliminated, a platform descends and you no longer run that risk but 2 other Stalfos will attack you. After a fierce battle, a chest containing the Fairy Bow appears. Once it's in your possession, exit the room through the East door (the one with a small logo).


In this room, there are 3 paintings where a blue Poe ghost sometimes appears. You must shoot an arrow into the painting where it appears. You must be far enough away otherwise it disappears from the painting when you look at it. By positioning yourself well, you should manage to put 1 arrow in each painting with the ghost which will trigger a battle against it. Go fight at the bottom. You must aim at it and avoid its spinning attacks. As soon as it appears, you must shoot an arrow (or 2). Once you've beaten it, the torch lights up blue and a large chest containing the compass appears. Leave through the bottom door and cross the Stalfos / bow room to find yourself in a room symmetrical to the previous one. Proceed exactly the same way except this time the ghost is orange and you will get the map.


Exit the room through the top door. Jump onto the platform opposite then on the one on the left to take the twisted corridor again. Cross the room with the Bubble skulls (Tetdoss) and go down the ladder. Go to the end of the corridor and jump to take the door just on the right. Cross the corridor, you are in the central room. Go take the Northeast door by shooting an arrow at the eye above it to unlock it. You are in the gardens. Go to the far right when exiting (to the south) and shoot an arrow at the eye located in the well to drain it. Go down and open the chest to retrieve the small key then go back up. Before going back up, you can go get a gold skulltula on the other side of the well and another one just by climbing up along the branches.


Return to the door you came out of and use the hookshot to reach the small ledge above. There is a gold skulltula that you can't miss here. Walk along the ledge to the right and play the Song of Time when you reach the edge. A block appears, jump on it then on the next one and play the melody again. Jump onto the new block and use the hookshot to kill the skulltula hanging on the vines then jump onto the vines. Climb up and go right once at the top to land on the balcony and find a small key.


You will have to return to the room where you obtained the compass to exit through the door at the top of the stairs. To do so, jump into the garden and take the door to reach the central room. Go take the West door again and climb all the way up with the hookshot. Take the ladder, then the door, cross the twisted corridor, take the door on the right, go down the stairs and take the door, cross the bow room and, finally, go up the stairs and open the door. In the next room, go right (if you fall, there is a ladder). Cross the currently non-twisted corridor and unlock the door.


In this room with a turnstile, start by taking the box on the right (by going across the rotating platforms) to place it in the middle on the large switch. Then return to one of the rotating platforms and try to aim at the frozen eye on the wall by passing your arrow through the fire of the torch that lit up when you stepped on the button. I think the easiest way is to aim at one or the other and "follow" it with your aim while drawing your bow to release when the two are aligned. Not that difficult actually. The corridor having "twisted", exit the way you entered.


Cross the famous corridor. Now the room is the other way around. Jump down and fall into the hole at the back right. You arrive in a room with a "checkerboard" floor. Pay attention to the ceiling which falls regularly to the ground and to the giant skulltulas whose shadow you see on the ground as usual. Don't hesitate to look and identify the places where the ceiling has holes before you start. You will need to reach the first switch. Once it's activated, turn around to go through the door that just opened (always watching out for the ceiling).


Here you are back in the garden but higher up. Jump slightly down to obtain a small key in a chest. Fortunately, you can climb back up by standing on the time block and playing the Song of Time. Another one appears, jump on it, play the melody again, jump onto the new block and go back through the door. This time you can go to the end of the checkerboard room and unlock the door.


The yellow Poe is "hidden". Shoot at its painting then reconstitute its image by pushing the blocks (the blue one is not part of the drawing). Then fight the yellow Poe like the orange and blue ones. The yellow torch lights up, take the door that unlocked and cross the corridor.


In the central room, Meg, the purple Poe, awaits you. She doesn't fight like the others. Her technique is to divide into 4 exactly identical ghosts and spin around you. Like most video game villains, Meg betrays herself (stupidly) because she does a spin at the moment the 4 ghosts appear. Since the other 3 don't spin, it's easy to recognize her, target her with Z, and shoot an arrow at her. Repeat the operation as many times as necessary (5), the purple flame lights up and the elevator comes back up.


Take the elevator to arrive in an almost round room. Actually, there is an octagonal wall that protects hidden entrances behind it; you can align the entrances with openings in this wall. To do so, you must push one of the wall sections that come back toward the center. Start by rotating twice clockwise. One of the 2 openings in the wall reveals a gate that can be opened by hitting the switch above it. Step on the button thus released to open a gate. Return to the middle of the room and rotate twice clockwise again. One of the 2 openings leads into a micro-room. Looking above the door, you will see an eye. Shoot it. A gate opens again just opposite where you are. Go in that direction, you can open the boss door.


Forest Temple - Boss: Phantom Ganon, Evil Spirit from the Beyond
You are in the boss room. To face him, enter the circle and try to leave. Ganon then appears and taunts you. Prepare to face Phantom Ganon, the evil spirit from beyond. The fight is divided into 2 parts.
-
Ganon attacks you first on his horse coming out of a painting. You will see 2 paintings from which Ganon arrives. Aim at one with your bow. There are 2 outcomes:
- Either Ganon turns back, in which case it's best to take refuge on one of the triforce symbols on the edge of the circle.
- Or Ganon comes out of a purple halo, in which case you must shoot an arrow while he is white.
- After a few arrows, Ganon falls from his horse and begins to levitate. Keep him targeted and wait for him to launch his attack. Reflect it with your sword as many times as he reflects it back to you. When his ball finally hits him, rush at him and hit him as much as possible with your sword while he is on the ground.


Phantom Ganon dies and the real Ganon tells you that this spectre was worthless and that when you face him for real, you will die. Take the heart then the teleporter, Saria gives you the Forest Medallion and tells you she doesn't hold a grudge for your disappearance. You reappear in the forest in front of the Deku Tree. A seed grows right in front of you and a miniature tree appears. It's the Deku Tree Sprout which will now be able to grow and replace the Deku Tree one day. He explains that you are not a real Kokiri and that's why you grew up. You are actually a Hylian and it was your mother who left you in the forest to save your life. You must save Hyrule and restore peace and love in this world (quite a program).


Perfectdams translated by Gemini
| Back to Zelda Ocarina Of Time Master Quest homepage |
| Back to Game Cube home |
- Français -- العربية -- বাংলা -- Deutsch -- English -- Español -- हिंदी -- Italiano -- 日本語 -- 한국어 -- Português -- Русский -- 中文 -